Getting Started with NS3: A Hands-On Guide to Network Simulation
What We’re Building Today
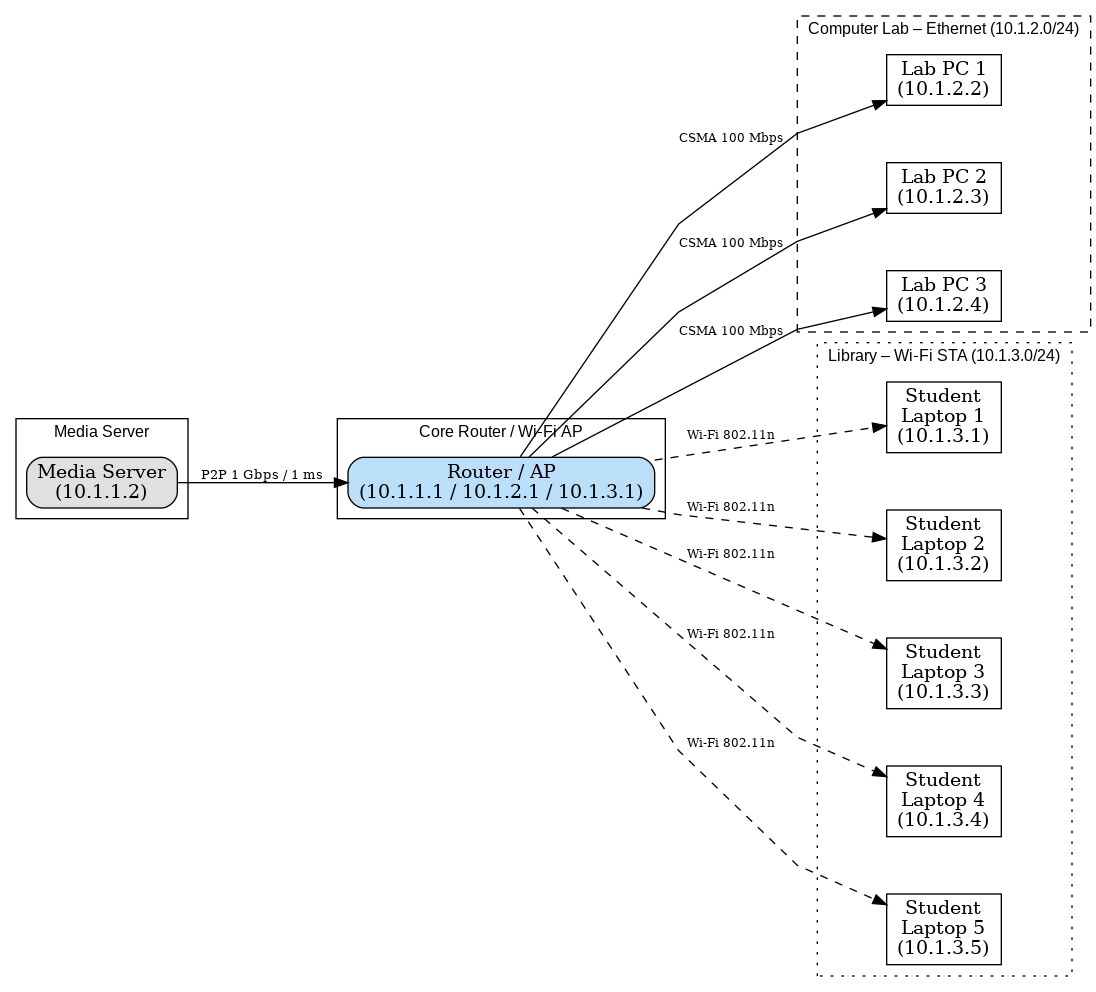
Picture this: You’re tasked with designing a campus network where students stream videos from a media server. Some students connect via WiFi in the library, others use Ethernet in computer labs, and everyone wants smooth playback without buffering. How do you test if your network design will actually work before spending thousands on equipment?
This is exactly where NS3 shines. Today, we’ll build this very simulation together, learning NS3’s essential modules along the way. By the end of this guide, you’ll understand how to create nodes, connect them with different technologies, run applications, and analyze whether your network can handle the load.
Setting Up Your NS3 Environment
Before we dive into coding, let’s get NS3 installed. On Ubuntu (which I recommend for beginners), you’ll need these prerequisites:
sudo apt-get update
sudo apt-get install g++ python3 python3-dev cmake git
sudo apt-get install python3-setuptools qtbase5-dev qtchooser qt5-qmake qtbase5-dev-tools
Now, let’s download and build NS3:
# Download NS3 (using version 3.39 as an example)
wget https://www.nsnam.org/releases/ns-allinone-3.39.tar.bz2
tar xjf ns-allinone-3.39.tar.bz2
cd ns-allinone-3.39/ns-3.39

# Configure and build
./ns3 configure --enable-examples --enable-tests
./ns3 build
The build process takes about 10-15 minutes. While it compiles, let’s understand what we’re about to create.
Understanding NS3’s Building Blocks
NS3 works like digital LEGO blocks. Each module represents a different networking component:
- Node Module: Think of nodes as computers, phones, or any device in your network
- NetDevice Module: These are like network cards (WiFi adapters, Ethernet ports)
- Channel Module: The medium connecting devices (air for WiFi, cables for Ethernet)
- Protocol Stack Module: The software that handles networking (like TCP/IP)
- Application Module: Programs that generate network traffic (video servers, web browsers)
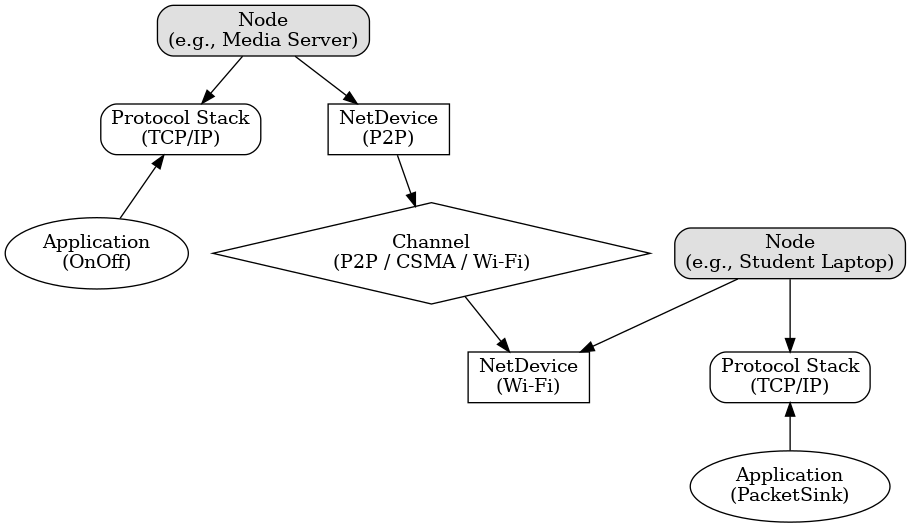
Let’s see how these pieces fit together by building our campus network simulation.
Creating Our First Simulation: The Campus Network
Create a new file called campus-network.cc in the scratch directory of your NS3 installation:
#include "ns3/core-module.h"
#include "ns3/network-module.h"
#include "ns3/internet-module.h"
#include "ns3/point-to-point-module.h"
#include "ns3/wifi-module.h"
#include "ns3/mobility-module.h"
#include "ns3/applications-module.h"
#include "ns3/flow-monitor-module.h"

using namespace ns3;

// This gives us logging capabilities - super useful for debugging!
NS_LOG_COMPONENT_DEFINE("CampusNetworkSimulation");

int main(int argc, char *argv[])
{
    // Enable logging so we can see what's happening
    LogComponentEnable("CampusNetworkSimulation", LOG_LEVEL_INFO);

    NS_LOG_INFO("Creating our campus network simulation");

    // Let's start building!
}
This basic structure imports all the modules we’ll need. The logging component helps us debug by printing messages during simulation. Think of NS_LOG_INFO as a sophisticated printf that you can turn on or off.
Step 1: Creating Nodes (The Network Devices)
Let’s add our network devices. In our campus scenario, we have:
- 1 media server
- 1 router (connecting everything)
- 3 Ethernet-connected lab computers
- 5 WiFi-connected student laptops
int main(int argc, char *argv[])
{
    LogComponentEnable("CampusNetworkSimulation", LOG_LEVEL_INFO);

    // Create the media server
    NS_LOG_INFO("Creating media server");
    NodeContainer mediaServer;
    mediaServer.Create(1);  // Just one server

    // Create the router that connects everything
    NS_LOG_INFO("Creating router");
    NodeContainer router;
    router.Create(1);

    // Create lab computers (connected via Ethernet)
    NS_LOG_INFO("Creating lab computers");
    NodeContainer labComputers;
    labComputers.Create(3);

    // Create student laptops (connected via WiFi)
    NS_LOG_INFO("Creating student laptops");
    NodeContainer wifiStudents;
    wifiStudents.Create(5);

    // The router will also act as the WiFi access point
    NodeContainer wifiAP = router;
}
Notice how we use NodeContainer to group similar nodes. This makes it easier to configure multiple nodes at once. Think of it like creating a list of devices that share similar properties.
Step 2: Setting Up the Point-to-Point Connection (Server to Router)
Our media server connects to the router with a high-speed link. The PointToPointHelper module makes this easy:
    // Configure the point-to-point link between server and router
    NS_LOG_INFO("Configuring server-to-router link");
    PointToPointHelper serverLink;

    // Set link properties: 1 Gbps bandwidth, 1ms delay
    // Think of this as a fiber optic connection
    serverLink.SetDeviceAttribute("DataRate", StringValue("1Gbps"));
    serverLink.SetChannelAttribute("Delay", StringValue("1ms"));

    // Install the link on both devices
    NetDeviceContainer serverDevices;
    serverDevices = serverLink.Install(mediaServer.Get(0), router.Get(0));
The DataRate is how fast data can flow (like the width of a pipe), while Delay is how long it takes for data to travel through the link (like the length of the pipe). These parameters directly affect application performance!
Step 3: Configuring Ethernet for Lab Computers
Lab computers connect via Ethernet. We’ll use the CSMA (Carrier Sense Multiple Access) module, which simulates Ethernet behavior:
    // Configure Ethernet for lab computers
    NS_LOG_INFO("Setting up Ethernet for lab computers");
    CsmaHelper csma;

    // 100 Mbps Ethernet with 2 microsecond delay
    csma.SetChannelAttribute("DataRate", StringValue("100Mbps"));
    csma.SetChannelAttribute("Delay", TimeValue(NanoSeconds(2000)));

    // Connect all lab computers and the router to the same Ethernet
    NodeContainer csmaNodes;
    csmaNodes.Add(router.Get(0));  // Router first
    csmaNodes.Add(labComputers);   // Then all lab computers

    NetDeviceContainer csmaDevices;
    csmaDevices = csma.Install(csmaNodes);
CSMA is interesting because all devices share the same medium (like multiple computers on the same switch). They have to take turns transmitting, which NS3 simulates realistically.
Step 4: Creating the WiFi Network
WiFi is more complex because wireless signals can interfere and nodes can move. Let’s set it up:
    // Configure WiFi for student laptops
    NS_LOG_INFO("Setting up WiFi network");

    // The PHY layer (physical layer) handles radio transmission
    YansWifiPhyHelper wifiPhy;
    YansWifiChannelHelper wifiChannel = YansWifiChannelHelper::Default();
    wifiPhy.SetChannel(wifiChannel.Create());

    // The MAC layer handles when devices can transmit
    WifiMacHelper wifiMac;
    WifiHelper wifi;

    // Use 802.11n (common in campuses)
    wifi.SetStandard(WIFI_STANDARD_80211n);

    // Configure the access point (router)
    Ssid ssid = Ssid("CampusWiFi");
    wifiMac.SetType("ns3::ApWifiMac",
                    "Ssid", SsidValue(ssid));

    NetDeviceContainer apDevice;
    apDevice = wifi.Install(wifiPhy, wifiMac, wifiAP);

    // Configure the student devices
    wifiMac.SetType("ns3::StaWifiMac",
                    "Ssid", SsidValue(ssid),
                    "ActiveProbing", BooleanValue(false));

    NetDeviceContainer staDevices;
    staDevices = wifi.Install(wifiPhy, wifiMac, wifiStudents);
The WiFi setup involves two layers:
- PHY (Physical): Handles radio waves, signal strength, interference
- MAC (Media Access Control): Manages who talks when to avoid collisions
We configure one node as an Access Point (AP) and others as Stations (STA) that connect to it.
Step 5: Positioning WiFi Nodes
Wireless nodes need positions because signal strength depends on distance:
    // Set up mobility (positions) for WiFi nodes
    NS_LOG_INFO("Positioning WiFi nodes");
    MobilityHelper mobility;

    // Access point is stationary at the origin
    mobility.SetMobilityModel("ns3::ConstantPositionMobilityModel");
    mobility.Install(wifiAP);

    // Students are scattered around the library
    mobility.SetPositionAllocator("ns3::RandomRectanglePositionAllocator",
                                  "X", StringValue("ns3::UniformRandomVariable[Min=0.0|Max=30.0]"),
                                  "Y", StringValue("ns3::UniformRandomVariable[Min=0.0|Max=30.0]"));

    // Students might move around slowly (studying, getting coffee)
    mobility.SetMobilityModel("ns3::RandomWalk2dMobilityModel",
                              "Bounds", RectangleValue(Rectangle(0, 30, 0, 30)),
                              "Speed", StringValue("ns3::ConstantRandomVariable[Constant=1.0]"));

    mobility.Install(wifiStudents);
The MobilityHelper module controls node positions and movement. Fixed nodes use ConstantPositionMobilityModel, while mobile nodes can use various movement patterns. Here, students wander randomly within a 30x30 meter area.
Step 6: Installing the Internet Stack
Now we need to give our nodes the ability to speak Internet protocols:
    // Install Internet stack on all nodes
    NS_LOG_INFO("Installing Internet stack");
    InternetStackHelper internet;
    internet.Install(mediaServer);
    internet.Install(router);
    internet.Install(labComputers);
    internet.Install(wifiStudents);
This installs TCP/IP on each node. Without this, nodes can send raw frames but can’t use IP addresses or run typical Internet applications.
Step 7: Assigning IP Addresses
Each network segment needs its own IP address range:
    // Assign IP addresses to each network segment
    NS_LOG_INFO("Assigning IP addresses");
    Ipv4AddressHelper address;

    // Server-to-router link: 10.1.1.0/30
    address.SetBase("10.1.1.0", "255.255.255.252");
    Ipv4InterfaceContainer serverInterfaces;
    serverInterfaces = address.Assign(serverDevices);

    // Ethernet network: 10.1.2.0/24
    address.SetBase("10.1.2.0", "255.255.255.0");
    Ipv4InterfaceContainer csmaInterfaces;
    csmaInterfaces = address.Assign(csmaDevices);

    // WiFi network: 10.1.3.0/24
    address.SetBase("10.1.3.0", "255.255.255.0");
    Ipv4InterfaceContainer apInterface;
    apInterface = address.Assign(apDevice);
    Ipv4InterfaceContainer staInterfaces;
    staInterfaces = address.Assign(staDevices);

    // Enable routing
    Ipv4GlobalRoutingHelper::PopulateRoutingTables();
Each SetBase call defines a new subnet. The router connects all three subnets, and PopulateRoutingTables() automatically configures routing between them.
Step 8: Creating the Video Streaming Application
Now for the fun part - actually using the network! We’ll create a video streaming server and clients:
    // Create video streaming server on the media server
    NS_LOG_INFO("Creating video streaming application");
    uint16_t videoPort = 5000;

    // Server application - sends video data
    OnOffHelper videoServer("ns3::UdpSocketFactory",
                            InetSocketAddress(Ipv4Address::GetAny(), videoPort));

    // Configure to simulate 4K video streaming (25 Mbps)
    videoServer.SetAttribute("DataRate", StringValue("25Mbps"));
    videoServer.SetAttribute("PacketSize", UintegerValue(1400));

    // Install server app on media server
    ApplicationContainer serverApp = videoServer.Install(mediaServer.Get(0));
    serverApp.Start(Seconds(0.0));
    serverApp.Stop(Seconds(30.0));

    // Create video clients on all student devices
    PacketSinkHelper videoClient("ns3::UdpSocketFactory",
                                 InetSocketAddress(Ipv4Address::GetAny(), videoPort));

    // Install on lab computers
    ApplicationContainer labClientApps = videoClient.Install(labComputers);
    labClientApps.Start(Seconds(1.0));
    labClientApps.Stop(Seconds(30.0));

    // Install on WiFi students
    ApplicationContainer wifiClientApps = videoClient.Install(wifiStudents);
    wifiClientApps.Start(Seconds(1.0));
    wifiClientApps.Stop(Seconds(30.0));

    // Configure the server to send to all clients
    for (uint32_t i = 0; i < labComputers.GetN(); ++i)
    {
        videoServer.SetAttribute("Remote",
            AddressValue(InetSocketAddress(csmaInterfaces.GetAddress(i+1), videoPort)));
        serverApp.Add(videoServer.Install(mediaServer.Get(0)));
    }

    for (uint32_t i = 0; i < wifiStudents.GetN(); ++i)
    {
        videoServer.SetAttribute("Remote",
            AddressValue(InetSocketAddress(staInterfaces.GetAddress(i), videoPort)));
        serverApp.Add(videoServer.Install(mediaServer.Get(0)));
    }
The OnOffHelper creates an application that alternates between sending data (On) and being quiet (Off). This mimics real video streaming behavior. The PacketSinkHelper creates applications that receive and consume data.
Step 9: Monitoring Network Performance
How do we know if our network design works? Let’s add monitoring:
    // Set up flow monitor to track performance
    NS_LOG_INFO("Setting up performance monitoring");
    FlowMonitorHelper flowHelper;
    Ptr<FlowMonitor> flowMonitor = flowHelper.InstallAll();

    // Also enable pcap tracing for detailed packet analysis
    serverLink.EnablePcap("campus-server", serverDevices.Get(0), true);
    csma.EnablePcap("campus-ethernet", csmaDevices.Get(1), true);
    wifiPhy.EnablePcap("campus-wifi", apDevice.Get(0), true);
The FlowMonitor tracks every flow (stream of packets between two endpoints) and collects statistics like throughput, delay, and packet loss. PCAP files can be opened in Wireshark for detailed analysis.
Step 10: Running the Simulation and Analyzing Results
Finally, let’s run the simulation and print results:
    // Run the simulation
    NS_LOG_INFO("Starting simulation");
    Simulator::Stop(Seconds(31.0));
    Simulator::Run();

    // Print flow statistics
    flowMonitor->CheckForLostPackets();
    Ptr<Ipv4FlowClassifier> classifier = DynamicCast<Ipv4FlowClassifier>
        (flowHelper.GetClassifier());

    FlowMonitor::FlowStatsContainer stats = flowMonitor->GetFlowStats();

    std::cout << "\n=== Flow Statistics ===" << std::endl;
    for (auto iter = stats.begin(); iter != stats.end(); ++iter)
    {
        Ipv4FlowClassifier::FiveTuple t = classifier->FindFlow(iter->first);

        std::cout << "Flow " << iter->first << " ("
                  << t.sourceAddress << ":" << t.sourcePort << " -> "
                  << t.destinationAddress << ":" << t.destinationPort << ")"
                  << std::endl;

        std::cout << "  Tx Packets: " << iter->second.txPackets << std::endl;
        std::cout << "  Rx Packets: " << iter->second.rxPackets << std::endl;
        std::cout << "  Throughput: "
                  << iter->second.rxBytes * 8.0 / 30.0 / 1000000.0
                  << " Mbps" << std::endl;
        std::cout << "  Mean Delay: " << iter->second.delaySum.GetSeconds() /
                     iter->second.rxPackets << " s" << std::endl;
        std::cout << "  Packet Loss: "
                  << (iter->second.txPackets - iter->second.rxPackets) * 100.0 /
                     iter->second.txPackets << " %" << std::endl;
        std::cout << std::endl;
    }

    // Clean up
    Simulator::Destroy();

    return 0;
}
Compiling and Running Your Simulation
Save your file and compile it:
cd ~/ns-allinone-3.39/ns-3.39
./ns3 build
Run the simulation:
./ns3 run campus-network
You’ll see output showing each flow’s performance. Look for:
- Throughput: Is it close to 25 Mbps per stream?
- Packet Loss: Should be near 0% for good video quality
- Delay: Lower is better for real-time applications
Understanding What Just Happened
Our simulation revealed several important insights:
- Wired connections perform better: Lab computers likely show consistent 25 Mbps throughput with minimal loss
- WiFi varies with distance: Students farther from the access point may experience lower throughput
- Shared medium effects: Multiple WiFi users compete for airtime, potentially reducing individual throughput
This is exactly what you’d see in a real campus network!
Key Modules Deep Dive
Let’s explore the modules we used more deeply:
The Application Module
NS3 includes several application models:
- OnOffApplication: Generates traffic in bursts (perfect for video)
- BulkSendApplication: Sends data as fast as possible (good for file transfers)
- UdpEchoClient/Server: Simple request-response (useful for testing)
- PacketSink: Receives and discards packets (simulates consumers)
The Mobility Module
Controls node movement with models like:
- ConstantPositionMobilityModel: Nodes don’t move
- RandomWalk2dMobilityModel: Random movement in 2D
- GaussMarkovMobilityModel: Smooth, realistic movement
- WaypointMobilityModel: Movement between specific points
The Energy Module (Not used above, but important)
Simulates battery-powered devices:
// Example: Adding battery to a WiFi node
BasicEnergySourceHelper energyHelper;
energyHelper.Set("BasicEnergySourceInitialEnergyJ", DoubleValue(100.0));
EnergySourceContainer sources = energyHelper.Install(wifiStudents);

WifiRadioEnergyModelHelper radioEnergyHelper;
DeviceEnergyModelContainer deviceModels =
    radioEnergyHelper.Install(staDevices, sources);
Experimenting and Learning More
Now that you have a working simulation, try these experiments:
- Increase WiFi users: What happens with 20 students instead of 5?
- Change video bitrate: Try 4K (25 Mbps) vs HD (5 Mbps)
- Add movement: Make students move faster - does it affect quality?
- Test different WiFi standards: Try 802.11g vs 802.11n vs 802.11ac
Each experiment teaches you something about network behavior!
Common Pitfalls and Debugging Tips
When things go wrong (and they will!), here’s how to debug:
- Enable logging for specific modules:
LogComponentEnable("OnOffApplication", LOG_LEVEL_ALL); LogComponentEnable("PacketSink", LOG_LEVEL_INFO); - Use NS_ASSERT for sanity checks:
NS_ASSERT_MSG(nodes.GetN() > 0, "Must create at least one node!"); - Check your addressing: IP conflicts cause silent failures
- Verify timing: Applications must start after network setup
- Use visualization:
./ns3 run campus-network --visshows animation (requires PyViz)
Next Steps in Your NS3 Journey
You’ve just built a complete network simulation! Here’s where to go next:
- Explore more modules: Try LTE, 5G, or IoT protocols
- Implement custom protocols: Create your own transport or routing protocol
- Scale up: Simulate hundreds or thousands of nodes
- Integrate with real code: Use DCE to run real Linux applications
- Contribute: Fix bugs or add features to NS3
Remember, every expert started exactly where you are now. The key is to experiment, break things, and learn from what happens. NS3 is forgiving - you can’t break real equipment, so experiment freely!
Quick Reference: Essential NS3 Patterns
Here are the patterns you’ll use repeatedly:
// Creating nodes
NodeContainer nodes;
nodes.Create(n);

// Connecting nodes
HelperClass helper;
helper.SetAttribute("Name", Value(value));
NetDeviceContainer devices = helper.Install(nodes);

// Adding protocols
InternetStackHelper stack;
stack.Install(nodes);

// Assigning addresses
Ipv4AddressHelper address;
address.SetBase("10.1.1.0", "255.255.255.0");
Ipv4InterfaceContainer interfaces = address.Assign(devices);

// Creating applications
ApplicationHelper appHelper(...);
ApplicationContainer apps = appHelper.Install(nodes);
apps.Start(Seconds(1.0));
apps.Stop(Seconds(10.0));

// Running simulation
Simulator::Stop(Seconds(duration));
Simulator::Run();
Simulator::Destroy();
These patterns form the backbone of every NS3 simulation. Master them, and you’ll be building complex networks in no time!
Happy simulating! Remember, the best way to learn NS3 is by doing. Start with this example, modify it, break it, fix it, and most importantly, have fun exploring the fascinating world of network simulation!