Ray Tracing from Scratch: A Comprehensive Guide to 3D Rendering Physics and Implementation
Introduction: The Magic of Ray Tracing
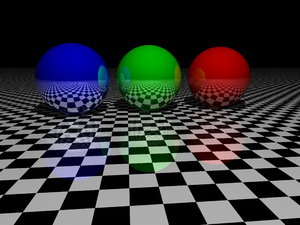
Ray tracing is one of the most elegant algorithms in computer graphics. It simulates the physical behavior of light to produce realistic images. Unlike rasterization (the technique used in most real-time graphics), ray tracing follows light’s path through a scene and captures effects like reflections, refractions, and shadows with high fidelity.
At a basic level, ray tracing is a computational implementation of geometric optics - the branch of physics that models light as rays traveling in straight lines until they encounter a surface. Unlike nature, where photons stream from light sources in all directions, ray tracing inverts this process for computational efficiency and traces rays backward from the viewer into the scene.
The Physics Behind Light Transport
The Dual Nature of Light
Light exhibits a fascinating wave-particle duality. For ray tracing, we primarily leverage the particle perspective, modeling light as discrete rays (photons) that travel in straight paths. However, understanding that light is also an electromagnetic wave helps explain phenomena like color (wavelength) and polarization.
While our implementation simplifies these aspects, commercial renderers often incorporate wave-based effects for more physically accurate results. For a deeper exploration of light’s dual nature, this Stanford lecture provides excellent theoretical foundations.
Geometric Optics and Light Interaction
When light interacts with matter, three primary phenomena occur:
-
Reflection: Light bounces off a surface, with the angle of incidence equaling the angle of reflection (specular reflection) or scattering across various angles (diffuse reflection)
-
Refraction: Light passes through a transparent medium, changing direction according to Snell’s Law:
\[n_1 \sin \theta_1 = n_2 \sin \theta_2\]Where $n_1$ and $n_2$ are the refractive indices of the two materials, and $\theta_1$ and $\theta_2$ are the angles of incidence and refraction.
-
Absorption: Materials absorb certain wavelengths of light, which we perceive as color
The Fresnel equations provide a comprehensive physical model for determining how much light is reflected versus refracted at a surface boundary based on the angle of incidence and material properties.
The Rendering Equation: The Mathematical Foundation
At the heart of physically-based rendering lies the rendering equation, introduced by James Kajiya in 1986:
\[L_o(x, \omega_o) = L_e(x, \omega_o) + \int_{\Omega} f_r(x, \omega_i, \omega_o) L_i(x, \omega_i) (\omega_i \cdot n) d\omega_i\]This equation states that the outgoing light from a point ($L_o$) equals the emitted light ($L_e$) plus the integral of all incoming light ($L_i$) from all directions, modulated by the material’s bidirectional reflectance distribution function ($f_r$) and the surface orientation.
While this integral is too complex to solve analytically for realistic scenes, ray tracing approximates it through sampling. For a more accessible introduction to the rendering equation and its implications, I recommend Scratchapixel’s explanation.
Implementing a Ray Tracer: From Theory to Code
Vector Mathematics: The Building Blocks
Three-dimensional vector operations form the foundation of our ray tracer:
class Vector3D {
public:
    double x, y, z;

    // Vector addition: Used for combining displacements
    Vector3D operator+(const Vector3D &v) const {
        return {x + v.x, y + v.y, z + v.z};
    }

    // Dot product: Used for light calculations and projections
    // Geometrically represents how aligned two vectors are
    double dot(const Vector3D &b) const {
        return x * b.x + y * b.y + z * b.z;
    }

    // Cross product: Creates a vector perpendicular to two others
    // Essential for calculating surface normals
    Vector3D cross(const Vector3D &b) const {
        return {y * b.z - z * b.y, z * b.x - x * b.z, x * b.y - y * b.x};
    }

    // Normalization: Converts to a unit vector (length 1)
    // Critical for direction vectors and normals
    void normalize() {
        double l = length();
        x /= l; y /= l; z /= l;
    }
};
Vector mathematics allows us to express geometric operations intuitively. For example, calculating a reflection vector becomes:
// Reflection calculation: R = D - 2(D·N)N
Vector3D calculateReflection(const Vector3D& incidentDir, const Vector3D& normal) {
    return incidentDir - normal * (2.0 * normal.dot(incidentDir));
}
For a comprehensive guide to vector mathematics in computer graphics, Immersive Linear Algebra offers an interactive exploration.
Ray-Object Intersection: The Core Algorithm
The mathematical complexity of ray tracing emerges in ray-object intersection calculations. For a sphere, we solve a quadratic equation derived from the sphere equation and parametric ray equation:
double Sphere::intersect(const Ray& r, Color& clr, int level) override {
    // Transform ray origin relative to sphere center for simpler calculation
    Vector3D ro = r.start - reference_point;
    Vector3D rd = r.dir;
    double radius = length;

    // Quadratic equation coefficients from the expanded form of:
    // ||(o + t*d) - c||^2 = r^2
    double a = 1;  // Equal to rd.dot(rd) which is 1 for normalized directions
    double b = 2 * rd.dot(ro);
    double c = ro.dot(ro) - radius * radius;

    // Calculate discriminant to determine number of intersections
    double discriminant = b * b - 4 * a * c;

    if (discriminant < 0) return -1;  // No intersection

    // Calculate intersection points
    double sqrtDiscriminant = sqrt(discriminant);
    double t1 = (-b - sqrtDiscriminant) / (2 * a);  // Near intersection
    double t2 = (-b + sqrtDiscriminant) / (2 * a);  // Far intersection

    // Return nearest positive intersection (in front of the ray)
    if (t1 > 0 && t2 > 0) return min(t1, t2);
    else if (t1 > 0) return t1;
    else if (t2 > 0) return t2;
    else return -1;  // Both intersections behind ray origin
}
The mathematics becomes more complex for other shapes. For triangles, we use the Möller–Trumbore algorithm, which efficiently computes barycentric coordinates to determine if a ray intersects a triangle:
double Triangle::intersect(const Ray& r, Color& clr, int level) override {
    Vector3D ro = r.start;
    Vector3D rd = r.dir;
    Vector3D v1 = points[0];
    Vector3D v2 = points[1];
    Vector3D v3 = points[2];

    // Edge vectors
    Vector3D edge1 = v2 - v1;
    Vector3D edge2 = v3 - v1;

    // Calculate determinant
    Vector3D h = rd.cross(edge2);
    double a = edge1.dot(h);

    // If determinant is near zero, ray lies in plane of triangle
    if (a > -EPSILON && a < EPSILON) return -1;

    double f = 1.0 / a;
    Vector3D s = ro - v1;

    // Calculate u parameter and test bounds
    double u = f * s.dot(h);
    if (u < 0.0 || u > 1.0) return -1;

    // Calculate v parameter and test bounds
    Vector3D q = s.cross(edge1);
    double v = f * rd.dot(q);
    if (v < 0.0 || u + v > 1.0) return -1;

    // Calculate t, ray intersects triangle
    double t = f * edge2.dot(q);
    if (t > EPSILON) return t;

    return -1;
}
For an excellent introduction to ray-triangle intersection algorithms, see Scratchapixel’s Ray-Triangle Intersection article.
Light Transport Simulation
The core of the renderer lies in the handleIllumination method, which implements the Phong illumination model and recursive ray tracing:
double Object::handleIllumination(const Ray& r, Color& clr, int level) {
    // Find intersection point
    double tMin = this->intersect(r, clr, level);
    if (tMin < 0 || level == 0) return tMin;

    Vector3D intersection_point = r.start + r.dir * tMin;
    Vector3D normal = this->getNormal(intersection_point);
    normal.normalize();

    // Start with ambient component - approximates indirect illumination
    clr = this->getColor(intersection_point) * coefficients[0];

    // For each light source
    for (Light light : lights) {
        Vector3D light_direction = light.position - intersection_point;
        double light_distance = light_direction.length();
        light_direction.normalize();

        // Handle spotlights - restrict light to a cone
        if (light.is_spotlight) {
            Vector3D light_to_point = intersection_point - light.position;
            light_to_point.normalize();
            double angle = light_to_point.dot(light.direction);
            if (angle > light.cutoff_angle) continue;  // Outside spotlight cone
        }

        // Shadow ray - check if path to light is blocked
        Vector3D shadow_ray_origin = intersection_point + light_direction * 0.0000000001;  // Offset to avoid self-intersection
        Ray shadow_ray(shadow_ray_origin, light_direction);

        bool in_shadow = false;
        for (Object* obj : objects) {
            double t = obj->intersect(shadow_ray, clr, 0);
            if (t > 0 && t < light_distance) {
                in_shadow = true;
                break;
            }
        }

        if (!in_shadow) {
            // Diffuse (Lambert) component - surfaces facing the light are brighter
            double lambert_factor = max(normal.dot(light_direction), 0.0);
            Color diffuse = this->getColor(intersection_point) * light.color * lambert_factor * coefficients[1];

            // Specular (Phong) component - creates highlights on shiny surfaces
            Vector3D reflection = normal * (2.0 * normal.dot(light_direction)) - light_direction;
            reflection.normalize();
            double specular_factor = max(pow((-r.dir).dot(reflection), shine), 0.0);
            Color specular = light.color * specular_factor * coefficients[2];

            clr = clr + diffuse + specular;
        }
    }

    // Handle recursive reflections
    if (level < recursion_level && coefficients[3] > EPSILON) {
        // Calculate reflection direction: R = D - 2(D·N)N
        Vector3D reflection_dir = r.dir - normal * (2.0 * normal.dot(r.dir));
        reflection_dir.normalize();

        // Create reflection ray with slight offset to avoid self-intersection
        Vector3D reflection_origin = intersection_point + reflection_dir * 0.0000000001;
        Ray reflection_ray(reflection_origin, reflection_dir);

        // Recursive call to trace reflection
        Color reflection_color;
        int nearest = findNearestIntersectingObject(reflection_ray, reflection_color);

        if (nearest != -1) {
            objects[nearest]->handleIllumination(reflection_ray, reflection_color, level + 1);
            clr = clr + reflection_color * coefficients[3];  // Add weighted reflection contribution
        }
    }

    clr.clip();  // Ensure color values stay in valid range
    return tMin;
}
This function implements:
- The Ambient Term: A simple approximation of indirect lighting
- The Diffuse Term: Based on Lambert’s cosine law
- The Specular Term: Creates highlights using Phong’s model
- Recursive Reflection: Traces additional rays for reflective surfaces
- Shadow Calculation: Determines if points are occluded from light sources
For a deeper dive into physically-based rendering models, the PBRT book is an invaluable resource.
Optimization Techniques in Ray Tracing
Ray tracing is computationally intensive, but several optimization techniques can dramatically improve performance:
1. Spatial Acceleration Structures
Our implementation doesn’t include spatial acceleration structures, which is a significant opportunity for optimization. These structures partition space to quickly eliminate entire groups of objects from intersection tests.
The three most common structures are:
- Bounding Volume Hierarchies (BVH): Organizes objects in a tree of nested bounding volumes
- kd-trees: Binary space partitioning with splitting planes perpendicular to coordinate axes
- Uniform Grids: Divides space into regular cells
Implementing a BVH could reduce the time complexity from O(n) to O(log n) per ray, where n is the number of objects. For a comprehensive guide to BVHs, see NVIDIA’s Introduction to Acceleration Structures.
2. Early Ray Termination
In our implementation, we could add early termination when:
// Early ray termination for shadow rays
if (in_shadow) break;  // No need to check other objects

// Early termination for fully reflective surfaces
if (coefficients[3] >= 1.0) {
    // Skip direct illumination calculation
}
3. Ray Coherence and Packet Tracing
Modern renderers often trace packets of nearby rays together to leverage SIMD (Single Instruction, Multiple Data) instructions and cache coherence. This technique is particularly effective for primary rays and shadow rays.
4. Multi-threading and GPU Acceleration
Ray tracing is “embarrassingly parallel” - each pixel can be computed independently. Our implementation could be enhanced with multi-threading:
void capture() {
    // [...setup code...]

    #pragma omp parallel for collapse(2)
    for (int i = 0; i < pixels; i++) {
        for (int j = 0; j < pixels; j++) {
            // Trace ray for this pixel
        }
    }
}
GPU-based ray tracing leverages specialized hardware for ray-triangle intersection tests. NVIDIA’s RTX technology and the OptiX framework provide hardware acceleration for real-time ray tracing. For more on GPU ray tracing, see NVIDIA’s Ray Tracing Essentials series.
Advanced Rendering Techniques
Our implementation covers the basics of ray tracing, but several advanced techniques could enhance its realism:
1. Anti-aliasing
We could implement anti-aliasing by shooting multiple rays per pixel with slight offsets:
Color samplePixel(int i, int j) {
    Color finalColor;
    const int SAMPLES = 16;  // 4x4 supersampling

    for (int si = 0; si < 4; si++) {
        for (int sj = 0; sj < 4; sj++) {
            // Calculate subpixel position
            double u = i + (si + 0.5) / 4.0;
            double v = j + (sj + 0.5) / 4.0;

            // Trace ray for this sample
            Vector3D pixelPos = calculatePixelPosition(u, v);
            Ray ray(eye, pixelPos - eye);
            Color sampleColor;

            int nearest = Object::findNearestIntersectingObject(ray, sampleColor);
            if (nearest != -1) {
                objects[nearest]->handleIllumination(ray, sampleColor, 1);
            }

            finalColor = finalColor + sampleColor * (1.0 / SAMPLES);
        }
    }

    return finalColor;
}
For an in-depth exploration of anti-aliasing techniques in ray tracing, see this article on adaptive sampling.
2. Global Illumination
True global illumination would trace paths with multiple bounces and incorporate indirect lighting. Path tracing, an extension of ray tracing, uses Monte Carlo integration to solve the rendering equation more completely:
Color pathTrace(const Ray& r, int depth) {
    if (depth > MAX_DEPTH) return Color();

    Color result;
    // Find intersection
    int nearest = findNearestIntersectingObject(r, result);
    if (nearest == -1) return Color();  // Background color

    Object* obj = objects[nearest];
    Vector3D hitPoint = r.start + r.dir * nearestT;
    Vector3D normal = obj->getNormal(hitPoint);

    // Sample random direction in hemisphere above surface
    Vector3D randomDir = sampleHemisphere(normal);

    // Recursive call - traces a random path continuation
    Ray newRay(hitPoint + randomDir * EPSILON, randomDir);
    Color indirectLight = pathTrace(newRay, depth + 1);

    // Combine direct and indirect lighting
    return directIllumination(hitPoint, normal) + indirectLight * brdf;
}
Path tracing produces more realistic results but requires many more samples. For an excellent introduction to path tracing, see Physically Based Rendering: From Theory to Implementation.
3. Refraction and Dielectrics
Adding refraction would allow for glass and water:
if (material.isTransparent) {
    // Calculate refraction using Snell's law
    double n1 = isEntering ? 1.0 : material.refractiveIndex;
    double n2 = isEntering ? material.refractiveIndex : 1.0;
    double ratio = n1 / n2;

    double cosI = -normal.dot(r.dir);
    double sin2T = ratio * ratio * (1.0 - cosI * cosI);

    if (sin2T < 1.0) {  // Total internal reflection doesn't occur
        Vector3D refraction = (r.dir * ratio) + (normal * (ratio * cosI - sqrt(1 - sin2T)));
        // Trace refraction ray...
    }
}
4. Physically-Based Materials
Modern renderers use microfacet BRDF models to simulate realistic materials:
Color evaluateMicrofacetBRDF(const Vector3D& wi, const Vector3D& wo, const Vector3D& n) {
    // Compute half-vector
    Vector3D h = (wi + wo).normalize();

    // Fresnel term (Schlick approximation)
    double cosTheta = wi.dot(h);
    Color F = F0 + (Color(1, 1, 1) - F0) * pow(1 - cosTheta, 5);

    // Distribution term (GGX)
    double alpha2 = roughness * roughness;
    double NdotH = n.dot(h);
    double denom = NdotH * NdotH * (alpha2 - 1) + 1;
    double D = alpha2 / (PI * denom * denom);

    // Geometry term (Smith)
    double G = geometrySmith(n, wi, wo, roughness);

    // Cook-Torrance BRDF
    return (F * D * G) / (4 * n.dot(wi) * n.dot(wo));
}
For a comprehensive guide to physically-based materials, see The Disney BRDF Explorer.
Camera Model
Our implementation uses a pinhole camera model:
void capture() {
    // Calculate viewing plane parameters
    double planeDistance = (windowHeight / 2.0) / tan((viewAngle / 2.0) * (PI / 180));
    Vector3D topLeft = eye + (lookVec * planeDistance) -
                      (rightVec * (windowWidth / 2.0)) +
                      (upVec * (windowHeight / 2.0));

    // Pixel spacing
    double du = (double)windowWidth / imageWidth;
    double dv = (double)windowHeight / imageHeight;

    // Loop through pixels
    for (int i = 0; i < imageWidth; i++) {
        for (int j = 0; j < imageHeight; j++) {
            // Calculate pixel position in world space
            Vector3D curPixel = topLeft + (rightVec * (i * du)) - (upVec * (j * dv));

            // Cast ray from eye through this pixel
            Ray ray(eye, (curPixel - eye));
            // [...]
        }
    }
}
This creates a virtual image plane at a specified distance from the eye point. More sophisticated camera models can incorporate:
- Depth of Field: By sampling points on a lens instead of a single eye point
- Motion Blur: By sampling ray origins at different points in time
- Lens Distortions: By warping the image plane according to lens characteristics
For an in-depth exploration of camera models in graphics, see Scratchapixel’s lesson on cameras.
File Format and Scene Description
Our implementation loads scene descriptions from a text file:
void loadData() {
    ifstream sceneFile;
    sceneFile.open("scene.txt");

    // Read global settings
    sceneFile >> recursion_level >> pixels >> object_count;

    // Read objects
    for (int i = 0; i < object_count; i++) {
        sceneFile >> object_name;
        if (object_name == "sphere") {
            // Read sphere parameters
        }
        else if (object_name == "triangle") {
            // Read triangle parameters
        }
        // [...]
    }

    // Read lights
    // [...]
}
More advanced renderers often use established scene description formats like:
- OBJ/MTL: For simple mesh and material descriptions
- Alembic: For animated scenes
- USD (Universal Scene Description): Pixar’s modern scene description format
- glTF: An efficient 3D format for web and mobile applications
For a comprehensive guide to 3D file formats, see The Open Asset Import Library.
Resources for Further Learning
Books
- Ray Tracing in One Weekend Series - An excellent starting point for implementing your own ray tracer
- Physically Based Rendering: From Theory to Implementation - The definitive guide to physically-based rendering
- Fundamentals of Computer Graphics - A comprehensive introduction to graphics principles
Online Courses
- Computer Graphics from UC San Diego - Covers ray tracing and other rendering techniques
- SIGGRAPH Courses - Industry-standard tutorials on various graphics topics
Implementations and Libraries
- Mitsuba Renderer - A research-oriented rendering system
- Embree - Intel’s high-performance ray tracing kernels
- OptiX - NVIDIA’s GPU ray tracing framework
Interactive Tutorials
- Shadertoy - Experiment with real-time ray tracing in the browser
- Inigo Quilez’s Website - Articles and interactive graphics demos
Conclusion
Ray tracing represents the intersection of physics, mathematics, and computer science, creating a powerful tool for simulating light’s behavior in virtual environments. While our implementation covers the fundamentals, modern ray tracers build upon these concepts with advanced algorithms and optimization techniques.
What makes ray tracing particularly beautiful is how naturally it captures complex optical phenomena. As you extend this implementation with physically-based materials, global illumination, and other advanced features, you’ll find that many effects emerge organically from the underlying simulation.
The journey from understanding the physics of light to implementing a ray tracer is one of the most rewarding experiences in computer graphics - a journey that continues to drive innovation in film, games, architectural visualization, and scientific research.